Services
In the service settings, you configure the DHCP service, DNS forwarding, VRRP, and other related parameters.
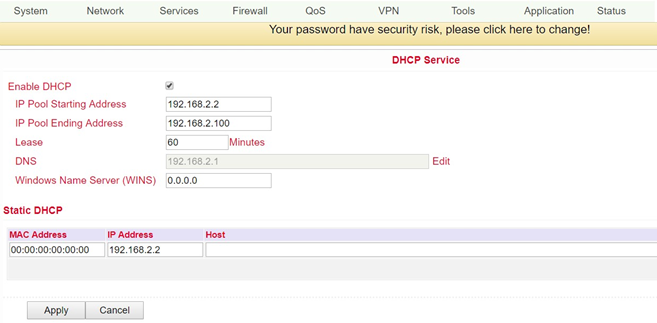
DHCP Service
The Dynamic Host Configuration Protocol (DHCP) is a communication protocol in network technology. It enables the assignment of the network configuration to clients through a server. In this way, devices in the network can be assigned IP addresses dynamically. You can access this service under Services > DHCP Service.
Name |
Description |
Default |
|---|---|---|
Enable DHCP |
Click to enable DHCP |
Enabled |
IP Pool Starting Address |
Set start IP address of the DHCP pool |
192.168.2.2 |
IP Pool Ending Address |
Set end IP address of the DHCP pool |
192.168.2.100 |
Lease |
Set valid lease time for the IP address received from the DHCP server |
60 minutes |
DNS |
Set DNS server (click via Edit) |
192.168.2.1 |
Windows Name Server |
Set WINS |
Blank |
Static DHCP (a maximum of 20 IP addresses can be set) |
||
MAC Address |
Set MAC address of a designated IP address |
Blank |
IP Address |
Set static IP address |
192.168.2.2 |
Host |
Set hostname |
Blank |
DNS
Up to two DNS servers can be entered here if the router is part of a domain network that uses DNS for address resolution. You can enter the data under Network > DNS.
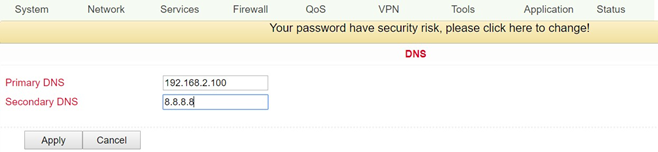
Name |
Description |
Default |
|---|---|---|
Primary DNS |
Set primary DNS |
Blank |
Secondary DNS |
Set secondary DNA |
Blank |
DNS Relay
When DNS relay is enabled (by default, if DHCP is set up), the IP address of the router is assigned to the DHCP clients as the DNS server. All DNS requests to the router are forwarded to your ISP’s DNS servers. If DNS Relay is disabled, the Router assigns the ISP’s DNS servers to the DHCP clients. You can access these settings via Services > DNS Relay.
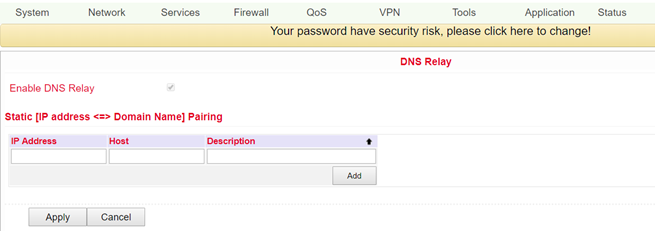
With the Add button up to 20 DNS pairs can be created.
Name |
Description |
Default |
|---|---|---|
Enable DNS Relay |
Click to enable DNS forwarding |
Enabled (after enabling DHCP) |
Static (IP Address <-> Domain Name) Pairing (maximum 20 DNS pairs) |
||
IP Address |
Set IP address <-> DNS pairs |
Blank |
Host |
Set names of IP address<->DNS pairs |
Blank |
Description |
Describe IP address<->DNS pairs |
Blank |
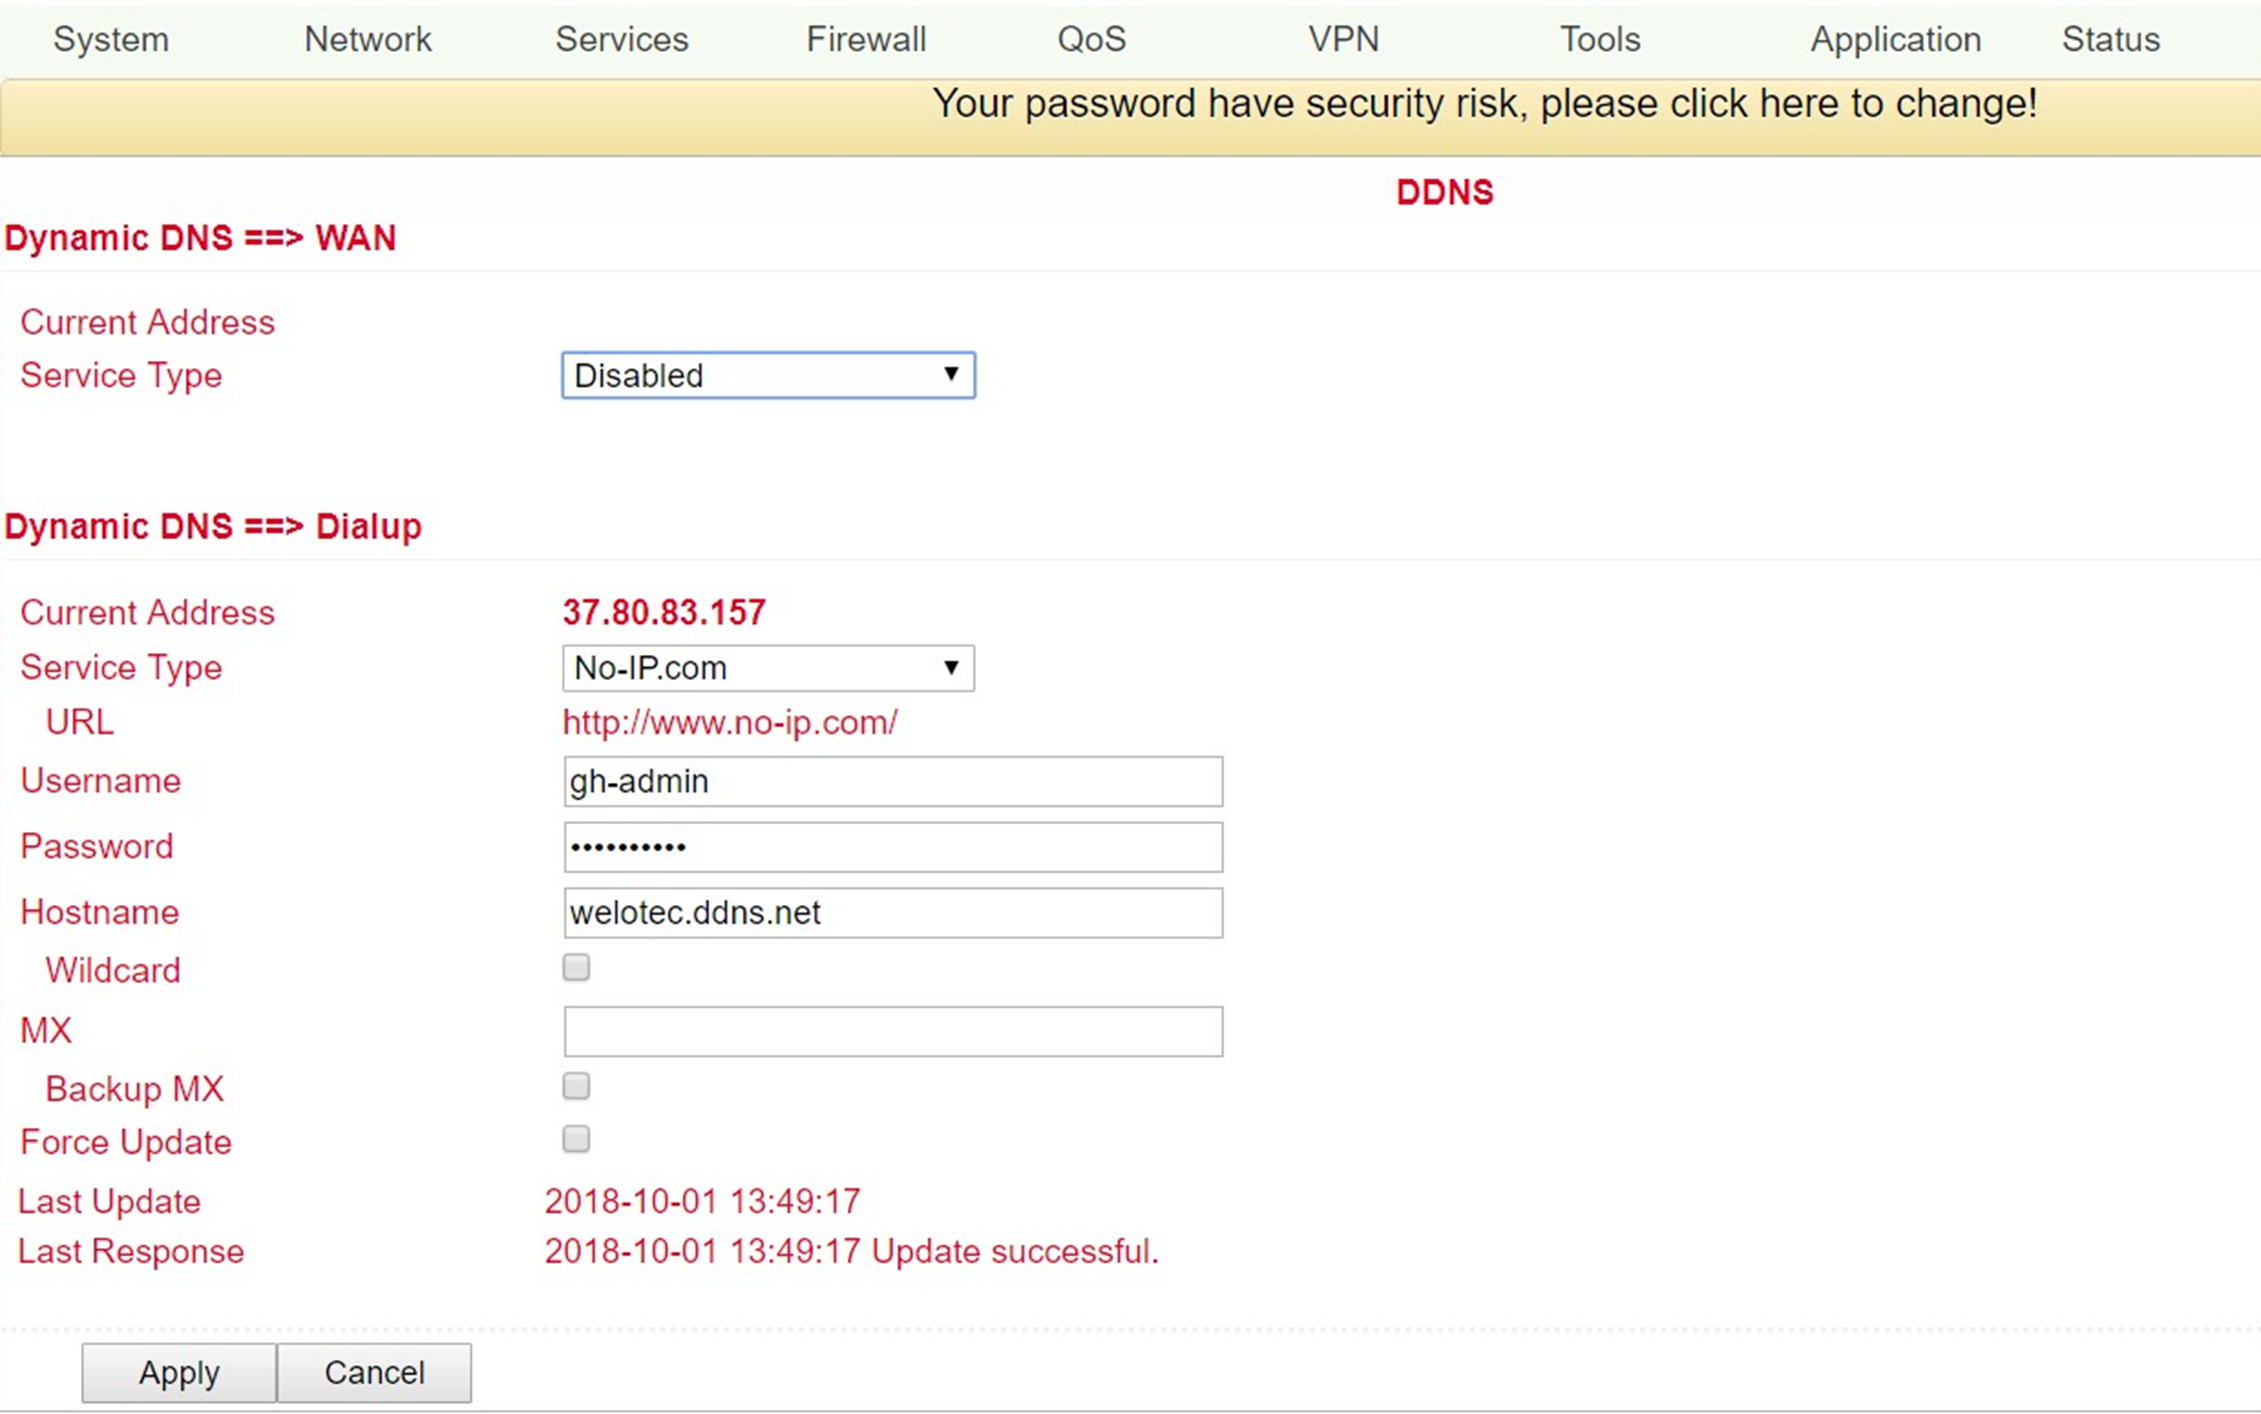
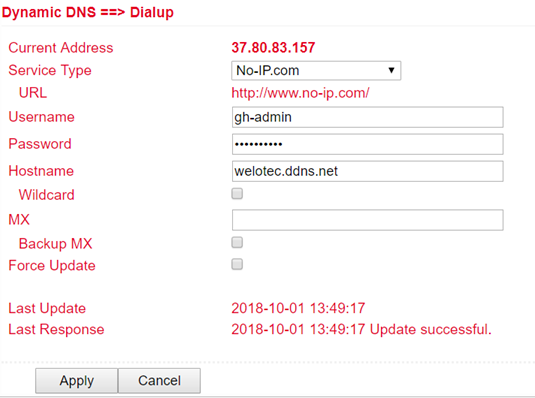
DDNS (Dynamic DNS)
DDNS or dynamic DNS is used if the WAN connection does not have a fixed public IP address, but services are still to be accessed externally. Since the IP address of the provider can change again and again with a normal WAN connection, a secure setup, e.g. of a VPN tunnel, is not possible. Therefore one uses providers of dynamic DNS servers, which ensure that your WAN connection always gets over the IP address. You can reach the configuration via Network > DDNS.
Name |
Description |
Default |
|---|---|---|
Current Address |
Show current IP address |
Blank |
Service Type |
Select DDNS provider |
Disabled |
There are various setting options for different DDNS service providers. These are selected via the service type.
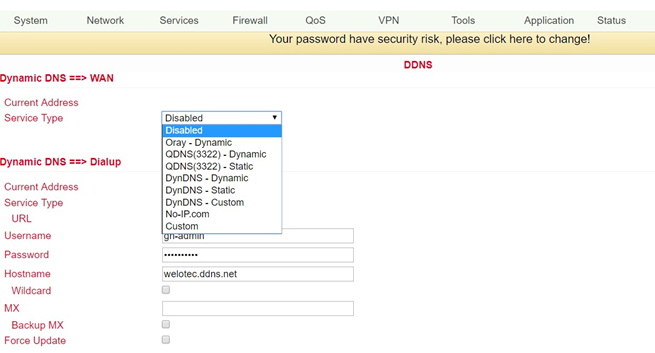
No-IP is used here as an example for the setup. For this, you need a No-IP account, which you have to create yourself. There are various providers here, some of which are free of charge, but some of which are subject to a charge. The assignment of the Dynamic DNS can be assigned to the WAN as well as to the dialup connection.
Name |
Description |
Default |
|---|---|---|
Service Type |
DynDNS - Dynamic |
Disabled |
URL |
http://www.dyndns.com/ |
Set |
Username |
Registered username for |
|
DDNS |
Blank |
|
Password |
Registered password for DDNS |
Blank |
Hostname |
Registered hostname for DDNS |
Blank |
Wildcard |
Can be activated if wildcard is to be used |
Disabled |
MX |
Entering an MX record |
Blank |
Backup MX |
Can be activated if MX-Record should run as backup |
Disabled |
Force Update |
Forces the update of the account |
Disabled |
Last Update |
Shows when the IP address was last changed |
|
Last Response |
Indicates the last time communication was made with the service |
DTU
DTU stands for Data Terminal Unit and is used to connect devices with serial interface (RS-232 and RS-485). You can create the configuration under Services > DTU. If DTU is activated, the console port is automatically deactivated.
Name |
Description |
Default |
|---|---|---|
Enable |
Click to activate DTU |
Disabled |
DTU Protocol |
Set DTU protocol |
Transparent |
Protocol |
Possible options are “TCP” and “UDP |
UDP |
Mode |
Set DTU as client or server, depending on DTU Protocol selection possible |
Client |
Frame Interval |
Set the frame interval in milliseconds |
100 msec |
Serial Buffer Frames |
Default buffer frames |
4 |
Multi-Server Policy |
Selection between Parallel and Poll |
Parallel |
Min Reconnect Interval |
Min Reconnect Interval |
15 Sec |
Max Reconnect Interval |
Max Reconnect Interval |
180 Sec |
DTU ID |
Default ID for the DTU |
Blank |
Source IP |
IP address of the source computer |
Blank |
DTU ID Report Interval |
Time interval for sending the DTU ID |
0 |
Source IP |
IP address of the source computer |
Blank |
DTU ID Report Interval |
Time interval for sending the DTU ID |
0 |
Multi Server |
||
IP-Adresse |
Set up IP address for receiving data |
Blank |
Server Port |
Set up server port for receiving data |
Blank |
Depending on the selection of the DTU protocol, the selection fields may vary.
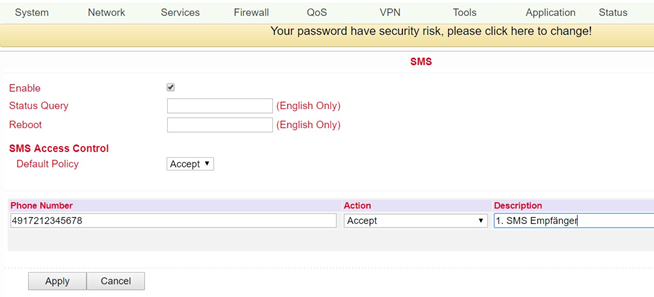
SMS
The TK500 can be reached from outside via SMS and reacts to various commands sent via SMS. You have the possibility to query the status of the device or to restart the device. The router is configured via Services > SMS.
Name |
Description |
Default |
|---|---|---|
Enable |
Click to enable or disable SMS control |
Disabled |
Status Query |
Set status request SMS to display the status of the router via SMS (e.g.: show status). |
Blank |
Reboot |
Lets the router restart (e.g. reboot) |
Blank |
SMS Access Control |
||
Default Policy |
Block or Accept control SMS from specific phone. |
Accept |
Phone Number |
Enter phone numbers to send SMS to router. The format for mobile number is 491712345678 (please do not enter +49 or 0049) |
Blank |
Action |
Accept or block the previously entered phone number |
Accept |
Description |
Description for the created dataset |
Blank |
To be able to send an SMS to the router, the mobile number of the inserted card must be known. The SMS is then sent to this number.
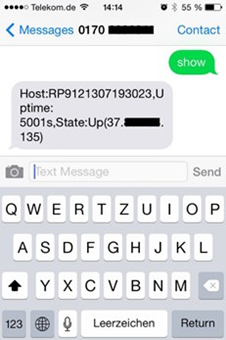
SMS that you receive on your cell phone:
Host: (SN);
Uptime: (the operating time of the router at the time of this reboot);
State: (Online/Offline) (Radio-WAN-IP)
LAN: (Ready) (LAN-IP)
Traffic Manager
The Traffic Manager can be used to provide the data consumption of the dial-up connection interface. You can configure this service under Services > Traffic Manager.
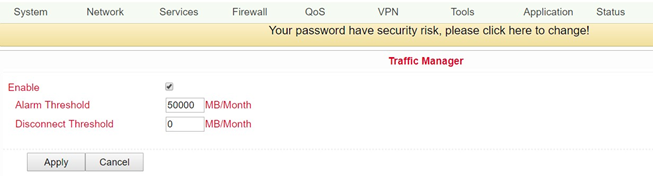
Name |
Description |
Default |
|---|---|---|
Enable |
Click to enable or disable SMS control |
Disabled |
Alarm Threshold |
Sets the amount of data in MB per month at which an alarm should be generated. If 0 is set as value, no alarm will be generated |
Blank |
Disconnect Threshold |
If the set value is reached, the dial-up connection is interrupted |
Blank |
The amount of data used can be checked at any time under Traffic Statistics (see 3.8.3).
Alarm Manager
The Alarm Manager can be used to generate various alarms. You can configure this service under Services > Alarm Manager.
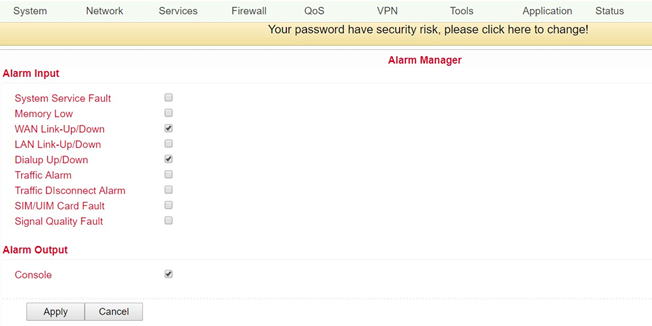
Name |
Description |
Default |
|---|---|---|
Alarm Input |
Select here the areas for which an alarm is to be generated |
none |
Alarm Output |
Here you can choose whether the alarms should be issued via the console or not |
selected |